
How to Achieve the VHS Look in Final Cut Pro: Step-by-Step Tutorial
A detailed tutorial on creating an authentic VHS look in Final Cut Pro using color grading, overlays, distortion effects, and audio processing techniques.
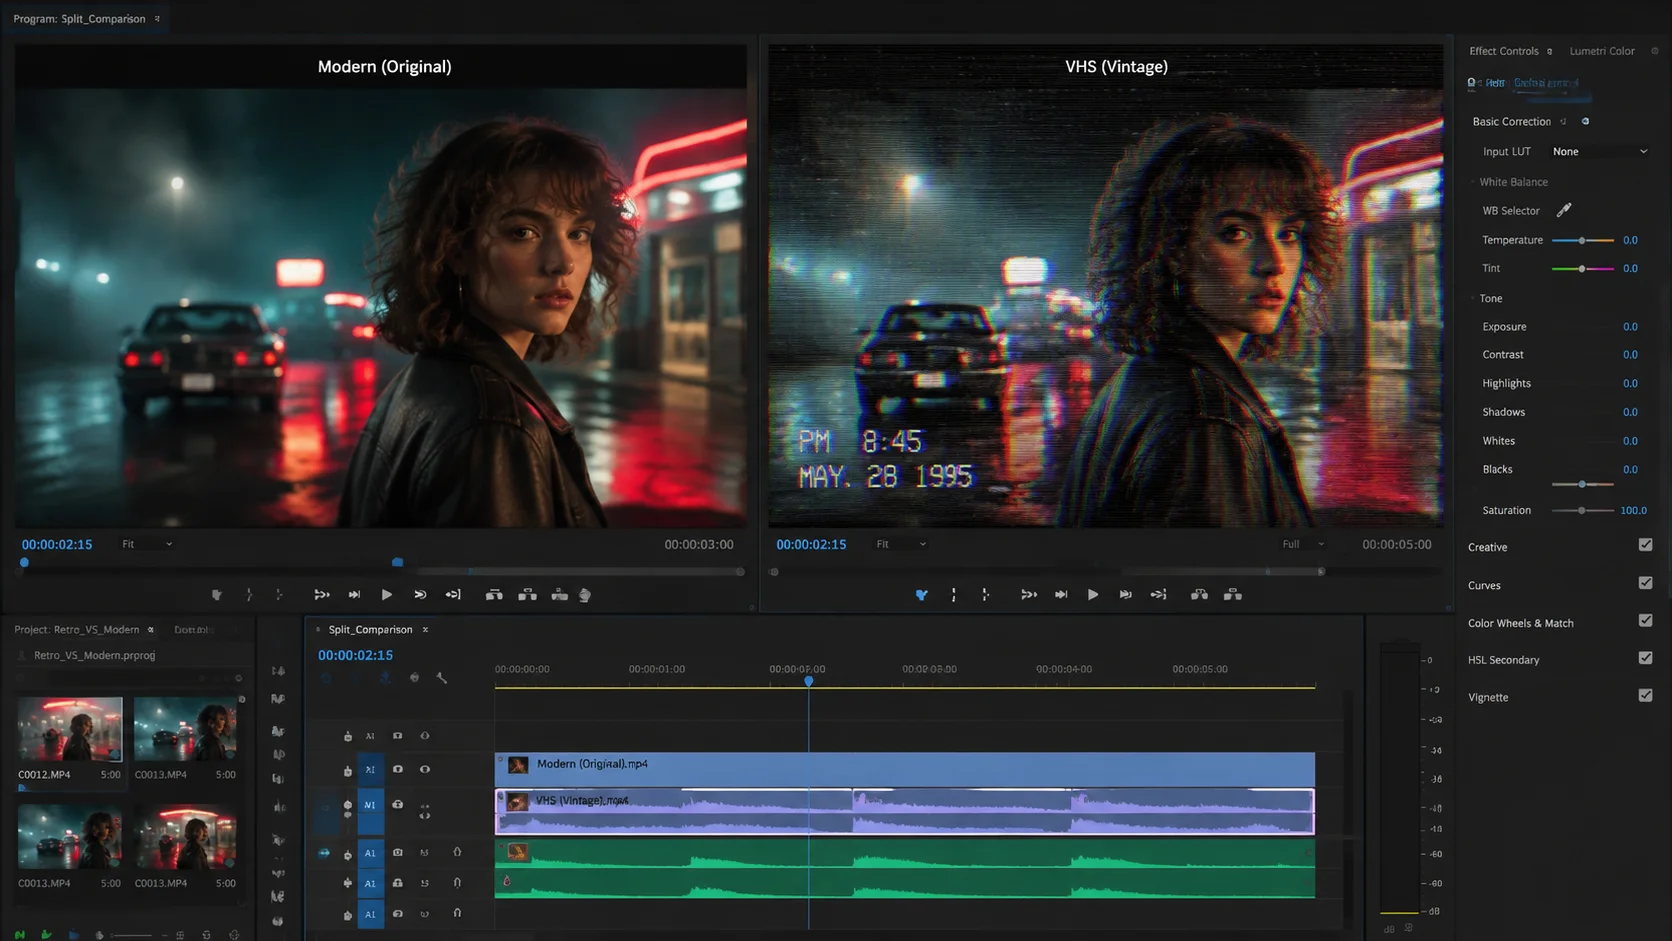
The VHS look is one of the most requested visual styles in modern video editing. From music videos and fashion films to YouTube vlogs and Instagram Reels, the degraded analog aesthetic adds character, nostalgia, and a distinctive mood that clean digital footage simply cannot replicate. Final Cut Pro provides all the native tools you need to build this look without purchasing additional plugins. This tutorial walks you through a complete, layered approach to VHS styling that covers color treatment, image degradation, scan line simulation, chromatic aberration, and audio warping. By the end you will have a reusable template you can apply to any project.
1. Building the Foundation with Color Grading
The VHS color palette is warm, slightly washed out, and has characteristic color bleeding in the red and yellow channels. Start by adding a Color Correction effect to your clip and reducing the overall contrast by roughly 10 to 15 percent. This simulates the limited dynamic range of magnetic tape. Next, shift the mid-tone balance toward amber or warm orange. In the Color Board, push the mid-tone puck slightly toward the orange-yellow region. Then increase the saturation of reds and warm tones by 10 to 20 percent while pulling back the saturation on cool tones like blue and cyan. Finally, lift the black point slightly so your darkest shadows are not pure black but a dark gray. This faded black level is one of the most recognizable features of VHS playback.
- Reduce overall contrast by 10 to 15 percent
- Push mid-tone color balance toward warm amber
- Increase red and yellow saturation, decrease blue and cyan
- Lift the black point to create faded dark grays instead of pure black
2. Adding Grain, Noise, and Softness
Real VHS tape was never clean. Add the built-in Noise effect from the Effects Browser at a subtle level, around 5 to 8 percent, to introduce analog-style grain. Follow this with a slight Gaussian blur at a radius of 0.5 to 1.0 pixels to remove the sharp digital edge from your footage. The combination of noise and blur creates the impression of a signal that has passed through a lossy analog chain. For a more advanced approach, you can add a second noise layer on a separate track with a different noise pattern and blend it using the Screen mode at very low opacity. This creates a more organic, randomized texture that looks less like a uniform digital filter.
- Apply the built-in Noise effect at 5 to 8 percent
- Add Gaussian blur at 0.5 to 1.0 pixel radius
- Layer a second noise track with Screen blend mode for organic texture
- Keep the effect subtle so subjects remain recognizable
3. Simulating Scan Lines and Tracking Artifacts
Horizontal scan lines and tracking noise bars are the visual signature of VHS. To create scan lines, generate a black solid and add thin white horizontal lines at regular intervals using the Lines shape generator. Scale the pattern so lines appear every two to four pixels, set the blend mode to Overlay, and reduce opacity to 15 to 25 percent. For the tracking bar, create a narrow horizontal band of white noise using a solid generator combined with the Noise effect, then animate its vertical position from bottom to top over 10 to 20 seconds. Set the blend mode to Add and keep opacity between 20 and 35 percent. For an authentic touch, occasionally make the tracking bar stutter or jump by adding keyframe variations to the position animation.
- Create scan lines using a Lines shape generator at 2 to 4 pixel intervals
- Set scan line overlay to Overlay blend mode at 15 to 25 percent opacity
- Animate a noise bar drifting vertically for the tracking effect
- Add position keyframe variations to simulate tracking stutters
4. Chromatic Aberration and Edge Distortion
VHS tape suffers from chrominance-luminance misalignment, which manifests as color fringing along high-contrast edges. You can simulate this in Final Cut Pro by duplicating your clip, splitting the duplicate into separate red, green, and blue channels using color mask effects, and offsetting one channel by one to three pixels horizontally. This creates a subtle color separation that is most visible on text, edges, and bright highlights. Another approach is to use the Prism effect if available in your version of Final Cut Pro, adjusting the intensity to a very low value. Edge distortion can be added with a slight VHS-style vignette that darkens the corners and introduces a subtle barrel distortion. These details elevate the look from a basic color grade to a convincing tape simulation.
- Duplicate clip and offset color channels by 1 to 3 pixels for fringing
- Use the Prism effect at very low intensity as an alternative
- Add a vignette that darkens corners for tape-edge simulation
- Apply subtle barrel distortion for CRT-style curvature
5. Audio Processing for the Complete VHS Experience
The visual look is only half the equation. VHS audio had a distinct character shaped by the limitations of linear tape recording. Apply a band-pass filter that restricts the frequency range to roughly 200 Hz through 8 kHz, mimicking the narrow bandwidth of VHS linear audio tracks. Add a subtle tape hiss layer using a white noise generator at very low volume. Introduce a slight chorus or flanger effect with minimal depth to simulate the pitch instability caused by tape speed fluctuations. For dialogue-heavy content, add a very subtle room reverb to simulate the playback speaker environment. When working with longer projects that contain many audio clips, AI-assisted tools like ClipMind can help you batch-analyze audio characteristics and apply consistent processing across all segments, ensuring a uniform VHS sound throughout.
- Apply a band-pass filter from 200 Hz to 8 kHz
- Layer low-volume white noise for tape hiss
- Add subtle chorus or flanger for pitch instability simulation
- Use light room reverb for dialogue to simulate speaker playback
- ClipMind can batch-analyze audio for consistent VHS processing
6. Creating a Reusable VHS Template Compound Clip
Once you have dialed in all the effects to your liking, save the setup as a reusable template. Select all the effect layers and the base clip, then create a Compound Clip and name it something like VHS Template. You can now duplicate this compound clip and replace the inner source footage while keeping all the effect layers intact. For even more efficiency, save the color correction settings as a custom preset in the Color Inspector so you can apply the base VHS grade to any new clip with a single click. Organize your templates in a dedicated library for easy access across projects. This approach saves significant time when you produce a series of VHS-styled videos. Creators who regularly work with retro aesthetics can also leverage ClipMind to automatically identify footage segments that would benefit most from the VHS treatment, further streamlining the creative workflow.
- Create a Compound Clip to preserve all effect layers together
- Save color correction as a custom preset for one-click application
- Organize templates in a dedicated library for cross-project access
- Use ClipMind to identify footage that best suits VHS treatment
FAQ
Do I need third-party plugins for a VHS look in Final Cut Pro?
No. Final Cut Pro native color correction, noise, blur, blend modes, and audio effects are sufficient to build a layered, convincing VHS look. Third-party plugins can speed up the process but are not required.
How do I prevent the VHS effect from making my footage look too muddy?
Keep each individual effect subtle. Noise should stay under 10 percent, blur under 1.5 pixels, and color shifts should be gradual rather than extreme. The VHS look works best when it is a collection of small imperfections.
Can I apply the VHS look to only part of a video?
Yes. Use the Blade tool to cut the section you want to stylize, then apply all VHS effects only to that segment. You can also use keyframes to fade effects in and out for a smooth transition between clean and VHS-styled footage.