
How to Create a VHS Effect in Final Cut Pro: Complete Guide
Learn how to create an authentic VHS effect in Final Cut Pro with step-by-step instructions covering color grading, noise, tracking lines, and audio distortion for a retro look.
The VHS aesthetic has made a massive comeback in music videos, short films, social media content, and even commercial projects. There is something nostalgic and visually compelling about the degraded colors, horizontal tracking lines, and warped audio that defined home video in the 1980s and 1990s. If you are working in Final Cut Pro, you have several powerful options for recreating this look without reaching for expensive third-party plugins. This guide walks you through every step of building a convincing VHS effect from scratch, using only the tools built into Final Cut Pro. Whether you want a subtle retro tint or a full-blown damaged tape look, the techniques below will get you there.
1. Understanding the VHS Aesthetic
Before applying any effects, it helps to understand what makes a VHS tape look the way it does. VHS recordings were made on magnetic tape with limited bandwidth, which resulted in soft image quality, reduced color saturation, and a characteristic warmth in the mid-tones. The tape mechanism introduced horizontal noise bars, occasional tracking errors, and subtle image wobble. Audio was recorded on a linear track that produced hiss, slight pitch variation, and compression artifacts. Replicating these imperfections in a digital editor means stacking several subtle effects rather than relying on a single filter. Understanding each component helps you decide how heavy or light you want the final look to be.
- Soft focus and reduced sharpness from limited tape resolution
- Color bleeding and oversaturation in reds and yellows
- Horizontal noise bars that drift vertically across the frame
- Audio hiss and subtle pitch wobble on the soundtrack
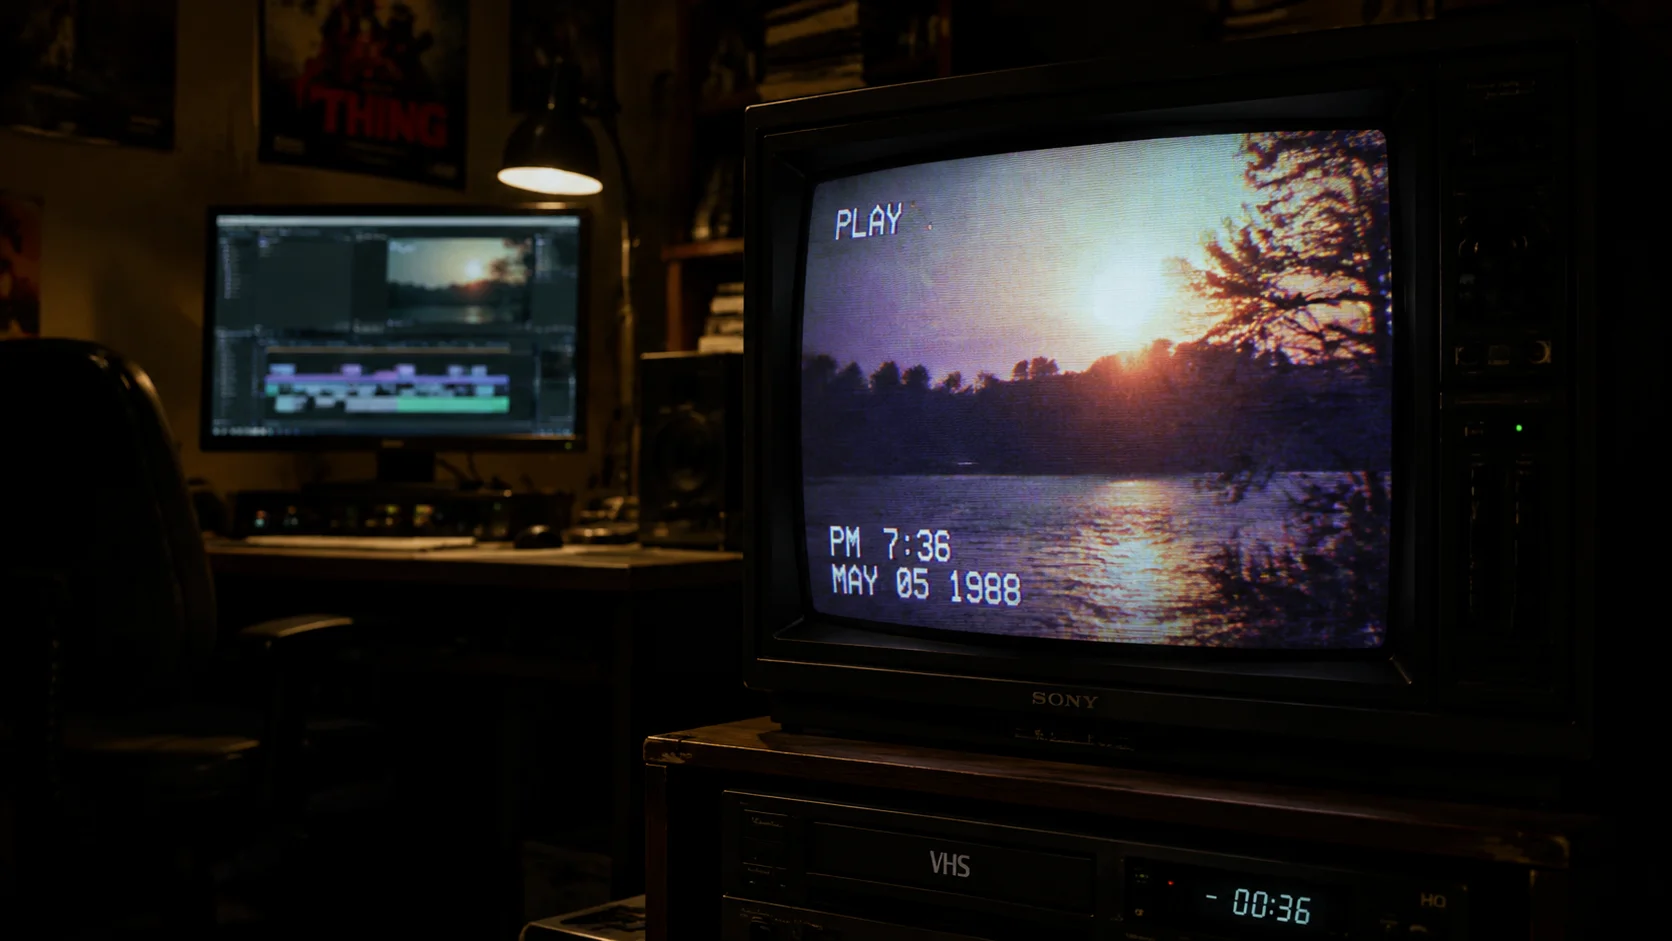
- Timestamp overlays and tracking glitch artifacts
2. Setting Up Your Project and Base Grade
Start by creating a new project in Final Cut Pro at your desired resolution. Even if your source footage is 4K, consider working at 1080p or even 720p to mimic the lower resolution of VHS tape. Import your clips and place them on the timeline. The first effect to apply is a color correction that shifts the image toward the VHS palette. Open the Color Inspector and reduce the overall contrast slightly, then push the mid-tones toward warm orange or amber. Drop the shadows a touch to simulate the crushed blacks common in tape recordings. Increase the saturation on reds and yellows while pulling back on blues and greens. This base grade sets the foundation that every other effect will build on.
- Set project resolution to 1080p or 720p for authentic softness
- Reduce contrast by 10 to 15 percent in the Color Inspector
- Push mid-tone color balance toward warm amber
- Boost red and yellow saturation while reducing blue and green
3. Adding Noise, Grain, and Softness
VHS tape is never perfectly clean. Add a noise or grain layer to simulate the analog signal path. In Final Cut Pro, you can use the built-in Noise effect found under the Effects Browser. Apply it at a low intensity, around five to ten percent, so it reads as subtle texture rather than overwhelming static. Next, apply a slight Gaussian blur to soften the image. A radius between 0.5 and 1.5 pixels is usually enough. The goal is to remove the clinical sharpness of digital footage while keeping subjects recognizable. You can also duplicate your clip, offset the duplicate by one or two pixels, reduce its opacity, and use a blend mode to create a ghosting effect that mimics tape head misalignment.
- Apply the Noise effect at 5 to 10 percent intensity
- Add Gaussian blur with a radius of 0.5 to 1.5 pixels
- Create a ghosting layer by duplicating and offsetting the clip
- Use the Overlay blend mode on the duplicate for tape head simulation
4. Creating Tracking Lines and Tape Glitches
One of the most recognizable features of VHS playback is the horizontal noise bar that drifts slowly from bottom to top of the screen. You can create this in Final Cut Pro using a solid color generator combined with a crop and position animation. Create a white or gray solid, crop it to a thin horizontal band, then animate its Y position from the bottom of the frame to the top over several seconds. Set the blend mode to Screen or Add and reduce opacity to around 30 percent. For more aggressive glitches, add brief moments of heavy distortion using the Displacement effect or a quick flash of static. These should be used sparingly, appearing for only a few frames at a time to simulate a tape catching on a worn head.
- Use a solid color generator to create a thin horizontal noise bar
- Animate Y position to drift the bar from bottom to top
- Set blend mode to Screen and reduce opacity to 30 percent
- Add brief static flash frames for aggressive tape glitches
5. Distorting the Audio for Authentic VHS Sound
Visual effects alone will not sell the VHS look. The audio needs to match. Start by applying a high-pass filter to cut frequencies below 200 Hz and a low-pass filter to cut above 8 kHz. This narrows the frequency range to match the limited bandwidth of VHS linear audio. Add a subtle amount of reverb to simulate the playback environment and introduce a very light chorus or pitch modulation effect to replicate tape speed instability. If your editing setup supports it, you can also layer in a low-volume white noise track to represent tape hiss. For an even more authentic result, export the audio, process it through a cassette deck or a tape emulation plugin, then re-import it. Tools like ClipMind can help you analyze audio waveforms and identify sections that need the most processing, saving time on longer projects.
- Apply high-pass at 200 Hz and low-pass at 8 kHz
- Add subtle reverb to simulate the playback environment
- Layer low-volume white noise for tape hiss simulation
- Consider processing audio through a physical cassette deck
- Use ClipMind to analyze waveforms and target processing areas
6. Finishing Touches and Export Settings
The final polish involves adding a timestamp overlay in the corner of the frame, which was standard on most consumer VHS camcorders. Use a text layer with a monospaced font and position it in the lower-left or lower-right corner. Set the color to bright white or yellow and add a subtle drop shadow for legibility. You can also add a date counter that increments to simulate a long recording session. For export, choose H.264 at a moderate bitrate around 8 to 12 Mbps. A lower bitrate introduces compression artifacts that complement the degraded VHS aesthetic. If you plan to share on social media, test the export at the platform recommended resolution to ensure the effect survives the upload compression. For creators who want to speed up this entire process, AI-powered tools like ClipMind can automatically analyze your footage and suggest which clips best suit a VHS treatment based on scene composition and color balance.
- Add a monospaced timestamp overlay in the corner
- Export at H.264 with 8 to 12 Mbps bitrate for added compression artifacts
- Test exports at social media platform resolutions
- Use ClipMind to identify clips that best suit a VHS treatment
FAQ
Can I create a VHS effect in Final Cut Pro without third-party plugins?
Yes. Final Cut Pro has all the built-in tools you need, including color correction, noise, blur, blend modes, and audio filters. By stacking these native effects, you can build a convincing VHS look from scratch.
What resolution should I use for a VHS-style project?
Working at 720p or 1080p gives the most authentic result since VHS tape resolution was roughly equivalent to 240 horizontal lines. Lower resolutions naturally soften the image in a way that mimics tape playback.
How do I make the VHS effect look subtle rather than overdone?
Reduce the intensity of each individual effect layer. Keep noise below 10 percent, blur under 1.5 pixels, and use tracking lines sparingly. The goal is a collection of small imperfections rather than one overwhelming filter.